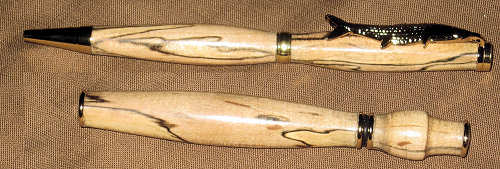
This was probably the nicest piece of spalted maple I got out of the whole experimental spalted maple pile.
|

|
| I took this piece to work one day more as a conversation piece than anything, and to let it dry for a couple more months. |
 |
It
came from this one particular log, which sat for about two years.
|

|
The
problem with this piece is that it is a little short, and the spalt
does not go all the way though the chunk.
|

|
| The
biggest mistake people make when dealing with spalt is how they cut it.
Make your best guess and cut directly through the middle of the
spalt, not around it. Bear in mind mind that a 7mm pen is quite
thin. You want to capture as much spalt as possible.
Approximately half of this spalted chunk is usable - the blanks
on the left. The other half looks nice on the surface, but there
is no depth. |

|
| It looks like I can get four pen blanks and one perfume pen out of this |

|
| When you drill these, drill straight through the center of the spalt, not the center of the blank. This will dramatically increase your chances for a decent looking pen. |

|
| These look pretty nice. The throw away chunks are on the right, in the back. |

|
Stick Fast got smart! Introducing the new, larger size CA glue. Use a medium
CA glue when gluing the brass inserts into spalted wood. Thin CA glue
absorbs faster into the spalt than it can considerably darken the blanks, and sometimes that is not desirable.
|

|
| And here we go! |

|
This is turning down fast and easily. Insofar as spalted wood goes, this is darn near perfect.
|

|
| A speed of somewhere around 1700 rpm is my preference for shaping. |

|
| Don't forget to keep a safe gap between the tool rest and the spalted blanks. |
 pe pe
|
Turning is going extraordinarily quick. Don't forget to take a width dimension so you get both pen blanks equal.
|

|
| This looks very nice. |

|
| Normally
I would use a backing board when sanding spalted blanks because of the
differences in density throughout the blanks. However, there is
not enough difference in textures to make a difference. This is
quicker too. |

|
These blanks are sanded down to 600 grit.
|

|
These guys are going to need a true CA glue finish.
Why?
Run
a CA glue test. Apply a drop of thin CA glue to one of the
blanks. If the entire drop disappears into the blank, a
true CA glue finish is probably the best bet.
If you use a thin
CA glue, you will considerably darken the pen blank and you will also
use a lot of thin CA glue. A medium CA glue will stay more on the
surface and the piece will end up lighter in color.
Coat one blank at a time using a medium CA glue.
|

|
| Apply
some EEE to a paper towel and rub it into the CA glue, turning at a
relatively high speed. Treat it as a friction polish. Stop
the lathe and examine the blank. If it doesn't look smooth,
repeat the procedure and then work the second blank. Don't try to
do both blanks at once because odds are the finish on one of them will
fail. |

|
These are being finished off with micro mesh, starting with 4000 and working up through 12000 grit.
I am not a big fan of micro mesh, but it does help to stay in practice. |
 |
| Don't forget to give the ends of the pen blanks a couple light swipes with the pen mill, getting rid of any excess CA glue. |

Use some care when pressing the pen pieces together. Remember, this is spalted wood we are dealing with. |

Not Bad!
Useful Tip: If
you are making something more specialized like this pen with a fish
clip, buy the 'contractor packs' instead of just one clip.
Now, on to the perfume pen..... |
 |
| Perfume pens are very easy to turn and there is plenty of meat to work with. |
 |
| The blanks are turning down quickly and there are no visible defects. This is going almost too well, |
 |
| A change of tools is going to be required in order to add some detail to the pen cap. |
 |
| This
small set is used for detail work. It is often found on Amazon on
sale. Go for some better quality steel if you can. |
 |
| Use some caution with these small tools, and keep the guide close to the piece. |
 |
| You can get as creative with the cap as you wish, but ensure the end design is something a person can easily clasp and pull. |
 |
| I sand these down to about 600 grit. |
 |
| CA
finishes are practically a requirement for these
turnings because perfume does a fine job of destroying most other
finishes over time. |
 |
| EEE is my finish of choice. Boiled linseed oil is another for CA finishes. |
 |
| Looks pretty good. |
 |
| I of course lost the directions many moons ago but this shouldn't be too hard to figure out. |
 |
| Not bad - kind of a his and hers set. |
 |
| I do like the fish - reminds me of something found in the waters up north. |


 pe
pe


